Why didn't you pass this out at the panel? Why did we have to come to your stupid blog to get the goods?!
ごめんけど、しかたがない。このチュトリアルはちょっと長いから、大変でした。プリントできません。
In other words, it was too long. But I can get more and better information to you guys this way, and it provides an easy way to contact me if you have additional questions.
What is RPG Maker 2003?
An oldie-but-goodie RPG Creation Engine by game company Enterbrain. Although similar to the ones released for the Playstation and Playstation 2, the battle system and scripting language in RPG Maker 2003 is both simple and powerful. The fact it's a PC program allows for easy importing of resources.
Most of us otaku have dreamt of being able to bring our fanfiction or original stories to life in JRPG form (you KNOW you have, don't deny it). This engine allows you to do just that. It's complicated enough to be powerful, while simple enough to learn in a relatively short amount of time.
I'm a baka when it comes to programming. Is it really even worth my time?
YES! As a matter of fact, anyone with a little patience and creativity can craft a JRPG using this engine. Admittedly, it's a lot easier to find resources than make your own, but the engine provides all that you need.
I'm a baka when it comes to drawing. I can't do art. Is this really even worth my time?
DEFINITELY! There are plenty of resources included in the program as well as capacity to import other stuff you find around the intarwebz. Of course, you can always make your own too, should you be artistically inclined.
Why 2003? Doesn't RPG Maker XP have an official English release? Why use its predecessor for this panel?
I've tinkered with the official English release of RPG Maker XP, and although the engine is more powerful and flexible than RPG Maker 2003's engine, it is also a lot less user-friendly. As opposed to 2003, which uses an event-based scripting language, XP contains an entire programming language. Since this panel is meant for beginners, XP really isn't the best place to start when crafting your masterpiece. If you're familiar with code though, go for it.
Where can I get the program?
Here: http://www.geocities.com/rpgmlinks/rpgm2k3.html
I'm not going to be handing out copies, since the copy I have is a fan translation.
Where can I get charset/faceset/music/tileset resources?
Again, check the site above. Since a lot of resources are creations derived from existing games, I'm not providing direct links.
1.) Project Creation
File -> New Project
Enter a Name and Location for your game.
2.) Map Creation
In order to generate your first map, open your project and right-click the file icon on the bottom-left corner of the interface (labeled with the name of your game). Select New Map. You will then see the following screen:


You can do a lot from here, but the main items you want to consider as basics are:
Name - The name of your map (for easy reference within a project)
Tileset - The tileset that will be used for your map. Note that a tileset is a set of items and textures that are placed on a grid to create a map layout (as will be referenced below).
Dimensions - Each map is a grid. So the default demensions are 20 boxes long by 15 boxes high.
Enemy Encounters - This is where you set the monster groups you'd like to appear as random encounters on this map. In this case, we don't want any. Click OK and you'll have your map.
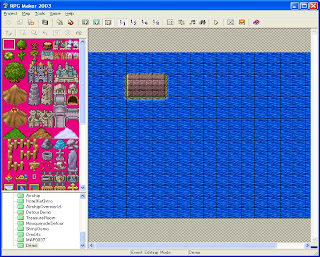
You can place objects from the left-hand side into your map using the interface above. The pencil icon allows you to place single-squares, the gray rectangle allows selection of map elements, the magnifying glass zooms using mouse buttons, the square and circle arrow icons allow placement of objects in a square or circle pattern respectively, and the paint can "fills" the entire area with the selected tile(s).
Tiles are multiple-select, so you can highlight a bunch at a time for placement...like so:
Placing the map is as easy as placing these tiles on the grid. There are three layers of tiles: the lower tile layer (represented by the green icon), the upper tile layer (represented by the blue icon), and the event tile layer (represented by the orange icon). Each tile layer has a different set of objects (though the event layer tends to overlap with the upper tile layer). If I select the event tile layer icon, look what happens to the interface:
The tileset changed. Each tileset has different objects for each of the three layers, so this provides a lot of flexibility when determining how to create your maps.
For now, switch back to the bottom layer and add some grass and perhaps a few stones and water to your map. It should look something like this:

3.) Character Setup via Database
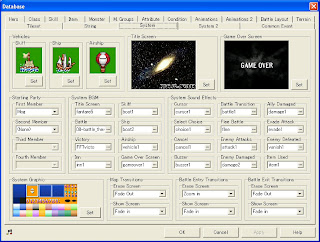
In order to set many options for your game, that is create and set character sprites, skills, items, levels, etc., you will need the Database. To reach it, go to Tools -> Database. There are far too many options to discuss in detail here, so let's just stick to the basics. For starters, the Hero tab:
This is where you create your characters. The ArraySize button determines the number of hero (playable) characters in your game. There are some default characters created when starting a new project with RPG Maker. You can modify character parameters, etc. from here as well. The RTP (the set of items already present in RPG Maker in order for you to play with) has a bunch of character sprites, battle sprites, and facesets for you to play with, but you can also import your own).
In order to make a playable game, two more items must be taken care of. First, go to the System tab and ensure your first hero is selected in the Starting Party list.
Now exit the database and select the Event layer. Right click and select "Place Party Starting Position".
This will spawn your character at that particular location when starting the game. For now, place it as shown.
There! Now you can test your game! To do this, click the big yellow arrow. Say yes to save your changes, and you're off! Select New Game from the menu, and you should be up and running.

All you can do at this point is walk around your map for now, but that's a start. See, that wasn't so bad, now was it?
Now that we got the basics out of the way, it's time to teach you some cool stuff. Instead of boring you with mounds of instructions, though, I'll PROVIDE the code and just explain it slightly. First, the talking NPC.
4.) The Talking NPC
First enter the event layer and highlight the spot two squares north of your hero's starting position. This will take you into the Event Editor.
Name your event Talking_NPC and click Set under Event Graphic to select an icon for your NPC. For simplicity, I will use the first character in the "hero 1" sprite set. This is included in the RTP.
Now under movement type, I select "Random" to make him walk around. There's no rhyme or reason to the pattern for this option, just like with most old-school RPG townsfolk.
Click New Page at the top of the dialog to ensure your event has two pages (this will be so the speech will change when speaking to the NPC a second time, as discussed below).
Now, copy the following code into the first page ( by highlighting an empty line of code in the Event Commands window)... this should take you to the Event Commands dialog, which contains lots and lots of options. For now, concern yourself with just the Face Graphics button (third button from the top) and the Message button (first button from the top). Click the Face Graphics button, then the Set button, then select the first face graphic from faceset Chara 1, 1 from the RTP. Click OK. Next, click the Message button and enter the text "Hi, I'm a talking NPC!" and click OK. Click the Message button again and enter the text: "In order to make me say something different, I need a switch!", then click OK again. Click OK to exit Event Commands.
After that, your event editor screen should look like this (sorry for the blur):
<>Change Face Graphics: Chara1, 1, Left,
<>Message: Hi, I'm a talking NPC!
<>Message: In order to make me say something
: :different, I need a switch.

Now, highlight the last line as shown above and enter the Event Commands window again. Choose Switch Operations (should be the sixth button from the top) and click it. Note the Message and Face Graphics buttons are how you entered the code shown above, in case that wasn't clear from earlier instructions.
Now, click the ... next to the Single Switch option, which should take you to the Switch array, allowing you to create a new Switch for this character. For simplicity's sake, name it "TALKING_NPC". You shouldn't need to increase the array size, as this will be your first Switch. My screen looks a bit different from yours since I have a few other switches spread across this project already.
Now click OK. Your newly created switch should be highlighted in the Switch Operations dialog. This is what we want.
Click OK again.
Your Event Commands should now look like this (commands listed below, to make up for compression blur >_<):
<>Change Face Graphics: Chara1, 1, Left,
<>Message: Hi, I'm a talking NPC!
<>Message: In order to make me say something
: :different, I need a switch.
<>Switch Operation: [0001:TALKING_NPC] ON

Now, since we created the second page of the event, click it. This will take you to a new Event Commands window. This time, we're going to utilize the Preconditions to make the Event Commands listed on this page occur ONLY if the TALKING_NPC switch is turned on. Do this by clicking the checkbox next to the first "Switch" Precondition, and select TALKING_NPC as your switch.
Set the event graphic to be the same hero as the first page (YES, you have to set graphics for events for each individual page. This comes in HANDY when doing items such as treasure chests, that have different graphics depending on whether they are open or closed!). Set movement type to "Random" again, otherwise your poor NPC will stop running around once you talk to him twice. Then enter some message text like that shown below (you can use Copy and Paste on Event Commands if you don't wish to re-click the buttons on the Event Commands dialog):
<>Change Face Graphics: Chara1, 1, Left,
<>Message: Hi, I'm a talking NPC!
<>Message: Wait a minute, didn't you already
: :talk to me?

Click OK and test your game again. Don't forget to talk to the NPC twice!
With that, you've been introduced to Events, and can make talking NPCs. Next, for the treasure chest...which really isn't that much different from what we've already done with the talking NPC!
5.) The Treasure Chest
I'll screen capture the event commands for the treasure chest, and then explain the new parts.
A treasure chest will need two switches and three pages. The first page will simply do a switch operation to call the second page, which adds the item to the inventory and changes the graphic from a closed treasure chest to an open treasure chest. The switches I created for this event are: TREASUREDEMO_1 and TREASURE_OPEN. The graphics used for the event are in the Object1 tileset of the RTP.
Select a location for your treasure chest and create a new event.
Here is the first page:
<>Switch Operation: [0002:TREASUREDEMO_1] ON
<>Call Event: This Event[2]

And the second page (note that the graphic is actually the same as the first page, but the facing is different... in order for the treasure chest to appear open, select Right facing for the treasure icon rather than Down. Don't forget your precondition for TREASUREDEMO_1. The next switch operation will allow the final page's text to display if the user tries to open the already-open treasure chest. You use the Item Management event command to add items to your inventory. You can choose the sound effect for opening the treasure chest, it isn't displayed in the event code but I used "Item 2".
<>Change Face Graphics: Erase
<>Move Event: Hero, Sound Effect
<>Message: Potion...GET!
<>Change Items: Potion 1 Add
<>Switch Operation: [0003:TREASURE_OPEN] ON
And finally:
<>Change Face Graphics: Erase
<>Message: It's open.
Now test it out. You should have a working treasure chest that adds a potion to your inventory, and tells you the chest is already open if you try to open it a second time.
7.) Miscellaneous Commands
Between the Talking NPC and Treasure Chest examples, you should be well on your way to understanding how events operate in RPG Maker...but there is so much more that events can do. The last section of this little document will point to some other event commands which have lots and lots of potential for interesting applications:
a.) Show Choices: This allows the formation of a Yes/No dialog and allows the user to make a choice. Separate event code is run depending on whether a user selects the Yes option or the No option. A more generic (and programmer-esque) structure is also provided in the "Conditional Branch" event command - which allows you to make If -> Else seletion structures. Loops are also provided in the "Loop" event command.
b.) Play BGM/Fade BGM/Play Memorized BGM: Allows you to change background music options.
c.) Tint/Flash/Shake/Pan Screen: Built-in special effects. You'll see that I used these several times in the Detour demo to provide greater variety in the dialogs. These are especially important when doing cutscenes with lots of interacting events.
d.) Show Battle Animation: Similar to what happens in the Final Fantasy old-school RPGs, this allows you to project a battle animation on a map screen as opposed to a battle screen. You can use this for dramatic situations in "cutscene" dialogs, or as effects with various purposes at other times (like blowing up boulders currently impeding a player's progress).
e.) Enemy Encounter: Generates an enemy encounter during an event. Great for "staged" battles during cutscenes, or battles with bosses visible from the map screen.
f.) Move event: Very flexible, allows the moving or teleportation of events. Useful in cutscenes and in other, slightly more devious and less obvious, ways.


No comments:
Post a Comment